April Blog Post Table of Contents:
April 6th Topic: The future of the blog after Spring Break
April 7th Topic: Step by step how to help your student get their school email up and running
April 8th Topic: Step by step how to use Google Images
April 9th-13th Topic: Using Google Hangout and the class status
April 14th Topic: Step by step how to create videos, create a YouTube Channel and upload your new video link to Google Classroom
April 16th Topic: Preparing for the World of Online Classes and April 20th
April 17th Topic: Step by step how to create a Google Hangout for you class and how to get into a meeting.
April 18th Topic: Sharing your Google Calendar Teacher Session 2
April 18th -April 20th Topic: Getting into a Google Classroom with a Class Code
April 20th Topic: Putting your video meeting link on your Google Classroom Main Page Teacher Session 3
April 21st-April 23rd Topics: Math Fluency Game, Taking a Screenshot, Using Paint 3D, Sending an image attachment in an email
Thursday, April 23, 2020
Tuesday, April 21, 2020
School From Home Session 19 Tuesday April 21st-April 23rd Topic: Math Fluency Online Game, Taking a Screenshot, Using Paint 3D and Sending an image in email
https://youtu.be/WD-9jCHGR50
CLICK LINK TO WATCH VIDEO FEED OF BLOG POST OVERVIEW
So much to talk about so I will dig right in.
Class Updates: You will have Media tomorrow at 12:30. You will have this class on Mondays and Wednesdays. See my class page to get the class code for his class.
First Topic: Math Fluency Online Game (Lew's MATH MASTERY SKILL)
Step 1- you will type the website in your web browser: www.topmarks.co.uk.


 On my PC on my desk the Print Screen just says prt sc in lower case.
 You will need one more button to make your computer take a selfie. You need to hold down the Windows button it is the button that has four squares at the bottom.


Blog Requests
If there is a topic that you would like to know more about, please leave a comment in my blog at the bottom and I will schedule a time to create something that makes whatever you are curious about easier to learn.
Following
If you are getting help from this blog, find it interesting, or just plain stupid to mildly amusing it was suggested I am supposed to invite/encourage you to become a follower. You can also follow me on YouTube if you just want to see the video links from there.
Hope you do thanks for watching, reading and...
Until next time...See ya'!
CLICK LINK TO WATCH VIDEO FEED OF BLOG POST OVERVIEW
So much to talk about so I will dig right in.
Class Updates: You will have Media tomorrow at 12:30. You will have this class on Mondays and Wednesdays. See my class page to get the class code for his class.
First Topic: Math Fluency Online Game (Lew's MATH MASTERY SKILL)
Step 1- you will type the website in your web browser: www.topmarks.co.uk.

Step 2 in the red circled area you will find "learning games", click on that.

Step 3 you will choose a category circled in the green area. The red arrow is pointing to multiplication and division. We will start with that as a class so click that.

Step 4 you will choose the game called Hit the Button so click on that.

Step 5 You can choose Times Tables circled in red for my 3rd, 4th and some 5th graders.
Most 5th graders should choose division.

Step 6 Here we will really define your mastery level. I will be specific with each student as to what I want you to choose. You want to work on the ones that give you the most trouble. For example, if you struggle with 8s. Choose those. You want to bring your 8s up to a level of MASTERY!

Step 7 Play

Step 8 Game Over and more practice
You should get used to playing 3-5 times each class. If it is too easy go to the Menu and find a way to make it a challenge. If it was hard, good, play again.
Great Job! You are now using this internet resource to build a math MASTERY skill!
Second Topic- Taking a Screenshot
Now I am going to teach you how to tell your computer to take a picture of what you are looking at on your computer screen. This is called a "screenshot."
Below you will see a few pictures of a keyboard. You want to find your Print Screen Button. On my laptop my Print Screen Button says PrtSC with some scissors. like you see below.
NOT EVERY COMPUTER IS THE SAME. CHROMEBOOKS HAVE A DIFFERENT KEYBOARD. I WILL SHOW YOU AFTER FURTHER DOWN WHAT KEYS TO USE.
IF YOU ARE HAVING TROUBLE WITH SCREENSHOTS, CONNECT WITH ME SO I CAN GIVE YOU AN ALTERNATIVE SOLUTION.


CHROMEBOOK SCREENSHOT

I MUST GIVE CREDIT TO MR. BROOKS FOR THE PIC. GREAT JOB MY MAN AND THANKS FOR THE HELP. HOLD THE CTRL KEY AND THE KEY AT THE TOP WITH A SQUARE AND TWO LINES TO THE RIGHT OF IT. IF YOU DO THIS AT THE SAME TIME YOU MADE A SCREENSHOT!!!
To take a "screenshot or a computer selfie", hold the Windows button down and keep holding it down while you hit the print screen button. Your screen will flash gray usually showing you that you did in fact take a picture.
Take a picture of your Hit the Button Score
Your computer saved your picture for you. You will be able to find that picture in the Screenshots Folder.
That takes care of that. Great job Photo Master. Let's keep rolling!
Third Topic: Using Paint 3D
So far so great, now let's use your screenshot as evidence of your greatness!
Follow the steps below to see how to use that screenshot and use the Paint 3D features on your computer.
Step 1 Find Paint 3D

Start by clicking the Windows button in the corner. Scroll down in your computer features that are in alphabetical order for you and click on the Paint 3D function.
Step 2 Click New to make a new picture.

Step 3 Click Menu

Step 4 Click Insert

Step 5 You are going into your computer files on this step. On the left you should see Screenshots is highlighted in light blue. You should be loading up a picture of your screenshot. Now, you are going to Double Click the screen shot you want and it will load on to your Paint 3D canvas. You can also click the screenshot once like show where the red arrow is and click Open down below. The double click will load it automatically though.

Step 6 Using the art tools and colors

Step 7 Go ahead and play around with these. Show me your Hit the Button Score and show me using paint tools and colors what you got by circling the score like I did in the picture.
Step 8 Saving your work. Go back to the Menu Button and click Save as...

Step 9 Choose Image

Step 10 Give it a name and hit Save! Good job.

LAST TOPIC: LOADING A PAINT 3D IMAGE TO AN EMAIL
So up this point, you are working on your mastery math skills with the game called Hit The Button.
You took a picture of your score with your computer.
You were able to upload your picture to Paint 3D.
You were able to work with the paint tools, colors and save your work.
You are now ready to show me how you did. This will help me know if you have mastery of a specific skill tailored to help you or if you need to spend more time practicing on that skill.
Oh, by the way, you just also learned a ton about your computer and what it can do for you! Not too shabby!
Step 1 Go to your email and hit Compose and Click on the Paper Clip looking button

Step 2 Doubleclick the screenshot you want to load to the email.

Step 3 As long as you have the email address in their and a subject, you just have to see that the screenshot is loaded and hit send.

BOOM! DONE!
Questions, comments, concerns: You know how to reach me.
If there is a topic that you would like to know more about, please leave a comment in my blog at the bottom and I will schedule a time to create something that makes whatever you are curious about easier to learn.
Following
If you are getting help from this blog, find it interesting, or just plain stupid to mildly amusing it was suggested I am supposed to invite/encourage you to become a follower. You can also follow me on YouTube if you just want to see the video links from there.
Hope you do thanks for watching, reading and...
Until next time...See ya'!
Monday, April 20, 2020
Teach Simplified Teacher Support Session 3 Topic: Put your Google Hangout Link on your Main Page Header
https://youtu.be/SpP7ubcsd4I
CLICK LINK ABOVE TO SEE VIDEO FEED OF TODAY'S POST OVERVIEW
Hello everyone,
In the fast paced information overload so many people are facing, I find this one quick tip will save you a whole lot of grief. I find having your meeting spot on your home page is extremely helpful moving folks to the right place to find you.
Step 1- Go to your Google Classroom Main Page and Click the Settings Wheel Icon
 Step 2 You will want to scroll down and find the "Generate Meet Link" Button
Once you click that, it will generate the link right then and there. All you have left to do is to click the Save Button the step 2 in blue.
 Step 3 Go see your new link in your Google Classroom Header
 The Red Arrow is showing where the link will pop up on your Google Classroom Main Page
That's it, so go chat away!
Blog Requests
If there is a topic that you would like to know more about, please leave a comment in my blog at the bottom and I will schedule a time to create something that makes whatever you are curious about easier to learn.
Following
So I have been at this for a little while now. If you are getting help from this blog, find it interesting, or just plain stupid to mildly amusing it was suggested to me by a 13 year old that I am supposed to invite/encourage you to become a follower.
Hope you do thanks for watching, reading and...
See ya'!
CLICK LINK ABOVE TO SEE VIDEO FEED OF TODAY'S POST OVERVIEW
Hello everyone,
In the fast paced information overload so many people are facing, I find this one quick tip will save you a whole lot of grief. I find having your meeting spot on your home page is extremely helpful moving folks to the right place to find you.
Step 1- Go to your Google Classroom Main Page and Click the Settings Wheel Icon

Once you click that, it will generate the link right then and there. All you have left to do is to click the Save Button the step 2 in blue.


That's it, so go chat away!
Questions, comments, concerns: You know how to reach me.
If there is a topic that you would like to know more about, please leave a comment in my blog at the bottom and I will schedule a time to create something that makes whatever you are curious about easier to learn.
Following
So I have been at this for a little while now. If you are getting help from this blog, find it interesting, or just plain stupid to mildly amusing it was suggested to me by a 13 year old that I am supposed to invite/encourage you to become a follower.
Hope you do thanks for watching, reading and...
See ya'!
School From Home Session 18 Monday April 20th Topic: How to get into a Google Classroom and Today's 3 Math Assignments
https://youtu.be/m5FZGhdAXTg
CLICK THE LINK ABOVE TO WATCH A VIDEO FEED OF TODAY'S OVERVIEW
In a mad rush of multitasking I taught the first math session and helped late comers get situated.
What I quickly learned was this.
Students should try to get into their Google Classes by email invitation first. This is the easiest way to get started.
If you don't do that you can go to the Google apps screen and go into each Google Classroom by using a class code. You need to know the class codes to join so you need some contact with your teachers to do that.
Therefore: I will show you how to join into a Google Classroom.
REMEMBER YOU CAN CLICK ON THE PICTURES TO ENLARGE AND SEE THE STEPS BY PICTURE.

Step 2 Pick the Google Classroom App, you may need to scroll down to find it with the gray slidebar on the right side of the pop up window the apps are in.

Step 3 Select the + button

Step 4 Join Class
 Step 5 Enter the Class Code Given to you by the teacher and Click Join

Boom You Are In!
Look for the link to join meetings in the class page heading and you are ready to go!
My math groups should find the link in the class page heading, you just need to click on that link and you are now in the class meetings which is a Google Hangout app.
TODAY's ASSIGNMENTS (3 tasks)
1) click on the attendance link, click yes then submit
2) Cabin Fever- see the comments below, you need to respond to me in an email.
3) What's Happening in your world? You will send me a video respond from the link. Don't forget to read the assignment so you know what to say once you clicked the link.
The Class assignment called Cabin Fever for my math class, requires you to watch the link.
The school Chromebooks block the video so you should try to load the video on a cell phone, iPad or another device. If that doesn't work for you just contact my during office hours and I will show the video from my screen for you to complete the assignment.
https://www.youtube.com/watch?v=iVC01GxFwDg
Good Luck!
Blog Requests
If there is a topic that you would like to know more about, please leave a comment in my blog at the bottom and I will schedule a time to create something that makes whatever you are curious about easier to learn.
Following
So I have been at this for a little while now. If you are getting help from this blog, find it interesting, or just plain stupid to mildly amusing it was suggested to me by a 13 year old that I am supposed to invite/encourage you to become a follower.
Hope you do thanks for watching, reading and...
See ya'!
CLICK THE LINK ABOVE TO WATCH A VIDEO FEED OF TODAY'S OVERVIEW
In a mad rush of multitasking I taught the first math session and helped late comers get situated.
What I quickly learned was this.
Students should try to get into their Google Classes by email invitation first. This is the easiest way to get started.
If you don't do that you can go to the Google apps screen and go into each Google Classroom by using a class code. You need to know the class codes to join so you need some contact with your teachers to do that.
Therefore: I will show you how to join into a Google Classroom.
REMEMBER YOU CAN CLICK ON THE PICTURES TO ENLARGE AND SEE THE STEPS BY PICTURE.

Step 1 Sign into you Google account and go into the Google Suite.
Signing into your email makes all of this much easier I would start with that but once you do the apps in the Google Suite are available to you just by signing in. See the red arrow once you signed into your account.Step 2 Pick the Google Classroom App, you may need to scroll down to find it with the gray slidebar on the right side of the pop up window the apps are in.

Step 3 Select the + button

Step 4 Join Class


Boom You Are In!
Look for the link to join meetings in the class page heading and you are ready to go!
My math groups should find the link in the class page heading, you just need to click on that link and you are now in the class meetings which is a Google Hangout app.
TODAY's ASSIGNMENTS (3 tasks)
1) click on the attendance link, click yes then submit
2) Cabin Fever- see the comments below, you need to respond to me in an email.
3) What's Happening in your world? You will send me a video respond from the link. Don't forget to read the assignment so you know what to say once you clicked the link.
The Class assignment called Cabin Fever for my math class, requires you to watch the link.
The school Chromebooks block the video so you should try to load the video on a cell phone, iPad or another device. If that doesn't work for you just contact my during office hours and I will show the video from my screen for you to complete the assignment.
https://www.youtube.com/watch?v=iVC01GxFwDg
Good Luck!
Questions, comments, concerns: You know how to reach me.
If there is a topic that you would like to know more about, please leave a comment in my blog at the bottom and I will schedule a time to create something that makes whatever you are curious about easier to learn.
Following
So I have been at this for a little while now. If you are getting help from this blog, find it interesting, or just plain stupid to mildly amusing it was suggested to me by a 13 year old that I am supposed to invite/encourage you to become a follower.
Hope you do thanks for watching, reading and...
See ya'!
Saturday, April 18, 2020
Teach Simplified Teacher Support Session 2 Topic: Sharing your Google Calendar
Hello everyone and welcome back to the teach simplified blog:
I am putting together a quick tutorial on inviting others to your Google Calendar.
CLICK LINK BELOW FOR THE VIDEO FEED OF THE BLOG OVERVIEW
https://youtu.be/DzyEpKh55E4
Step 1 Go to your Google Calendar and find your "My Calendars" tab on the left side of the screen as shown in the image below.


Blog Requests
If there is a topic that you would like to know more about, please leave a comment in my blog at the bottom and I will schedule a time to create something that makes whatever you are curious about easier to learn.
Following
So I have been at this for a little while now. If you are getting help from this blog, find it interesting, or just plain stupid to mildly amusing it was suggested to me by a 13 year old that I am supposed to invite/encourage you to become a follower.
Hope you do thanks for watching, reading and...
See ya'!
I am putting together a quick tutorial on inviting others to your Google Calendar.
CLICK LINK BELOW FOR THE VIDEO FEED OF THE BLOG OVERVIEW
https://youtu.be/DzyEpKh55E4
Step 1 Go to your Google Calendar and find your "My Calendars" tab on the left side of the screen as shown in the image below.

Click on image to enlarge and check out other blog images in succession.
Step 2 Click on the 3 dots on the right edge of the calendar you want to share.
Step 3 Click on Setting and Sharing above the rainbow dots as shown in the image below.

Step 4 Now a drop screen will pop up as you see below and you want to look for the button with blue lettering that says " +Add People" and Click it.

Step 5 Last steps: add the emails you want in the red step, hit send in the second blue step and Pow! you are done!

Questions, comments, concerns: You know how to reach me.
If there is a topic that you would like to know more about, please leave a comment in my blog at the bottom and I will schedule a time to create something that makes whatever you are curious about easier to learn.
Following
So I have been at this for a little while now. If you are getting help from this blog, find it interesting, or just plain stupid to mildly amusing it was suggested to me by a 13 year old that I am supposed to invite/encourage you to become a follower.
Hope you do thanks for watching, reading and...
See ya'!
Friday, April 17, 2020
School From Home Session 17 Friday April 17th Today's Topic: Creating a Google Hangout for your Class and How to get into a meeting
https://youtu.be/qeU4-ipj7fc
Click on me for a video feed of the blog overview:
Hello everyone and welcome back to the Teach Simplified blog:
The first lesson of this posting is for people that want to learn how to create a video meeting for others to join. Best suited for: teachers, adults, administrators, etc.
The second lesson of the posting is more for students, parents or anyone just trying to get the hang of all of this.
Lesson 1 Making a video meeting.
This is something I will be asking my students to do at some point since they will have access to all of this stuff. I want them to get really darn good at using the tools that they will master in their professional lives.
Since you are already able to get into your email from a previous blog lesson and know where the "waffle" is. Let's start with the 9-dot waffle thing known as Google Suite or G-Suite where the apps are at. You want to select the app called "Calendar".


Step 1 Pick the day and the time you want to start and end the meeting.
Step 2 Give your meeting a name
Step 3 Add in all of the emails you want to enter into your video meeting. Put a , and space between each email.
OR
I like to copy all of the emails from somewhere and paste them right in. This is SOOOOOO much faster and easier than typing and finding 30 emails.
Step 4 The key component: Add location or conferencing. Um... yes please!
When you add conferencing you are creating a place for people to join you in the video meeting.
It will give you two things to click, a button for add location which I skip for making a video meeting.
When you click the add conferencing button, it will pop up something that says Join Hangouts Meet in blue letters.
Below that it now gives you the link that you will send to everyone and you will also click on that link yourself when it is time to start the meeting.
It will also say how many people can join the meeting.

All you have left to do is to save your meeting.
It will save into your calendar and your screen will go back to the calendar. So when you are ready to join your own meeting you made.

You just have to remember to go to Google Calendar, click on the spot you created in the spot I circled in purple and click that link to jump in.

Click the link and...
 You're in!
Click join now and start the show!
Lesson 2 Joining a meeting
This is the easier part. You join in easiest by just clicking on a link someone sent you somehow. Joining a meeting is best by joining through email.
 Go to the email that was sent to you and simply click the link they invited you to join on.
 Congratulations you are in and ready to go!
If you made it to this point you will figure out how to tinker around with this app when you get there.
You got this far, you can take it from here!
Enjoy your meeting!
Blog Requests
If there is a topic that you would like to know more about, please leave a comment in my blog at the bottom and I will schedule a time to create something that makes whatever you are curious about easier to learn.
Following
So I have been at this for a little while now. If you are getting help from this blog, find it interesting, just plain stupid to mildly amusing it was suggested to me by a 13 year old that I am supposed to invite/encourage you to become a follower.
Hope you do thanks for watching, reading and...
See ya'!
Click on me for a video feed of the blog overview:
Hello everyone and welcome back to the Teach Simplified blog:
The first lesson of this posting is for people that want to learn how to create a video meeting for others to join. Best suited for: teachers, adults, administrators, etc.
The second lesson of the posting is more for students, parents or anyone just trying to get the hang of all of this.
Lesson 1 Making a video meeting.
This is something I will be asking my students to do at some point since they will have access to all of this stuff. I want them to get really darn good at using the tools that they will master in their professional lives.
Since you are already able to get into your email from a previous blog lesson and know where the "waffle" is. Let's start with the 9-dot waffle thing known as Google Suite or G-Suite where the apps are at. You want to select the app called "Calendar".

Google Calendar App
It may not be in the same place as where mine is on your screen but it is usually in the first few apps.
Click on it and of course a calendar will pop up.

Click on the picture above for a better look at the colorful arrows.
Step 1 Pick the day and the time you want to start and end the meeting.
Step 2 Give your meeting a name
Step 3 Add in all of the emails you want to enter into your video meeting. Put a , and space between each email.
OR
I like to copy all of the emails from somewhere and paste them right in. This is SOOOOOO much faster and easier than typing and finding 30 emails.
Step 4 The key component: Add location or conferencing. Um... yes please!
When you add conferencing you are creating a place for people to join you in the video meeting.
It will give you two things to click, a button for add location which I skip for making a video meeting.
When you click the add conferencing button, it will pop up something that says Join Hangouts Meet in blue letters.
Below that it now gives you the link that you will send to everyone and you will also click on that link yourself when it is time to start the meeting.
It will also say how many people can join the meeting.

All you have left to do is to save your meeting.
It will save into your calendar and your screen will go back to the calendar. So when you are ready to join your own meeting you made.

You just have to remember to go to Google Calendar, click on the spot you created in the spot I circled in purple and click that link to jump in.

Click the link and...

Click join now and start the show!
Lesson 2 Joining a meeting
This is the easier part. You join in easiest by just clicking on a link someone sent you somehow. Joining a meeting is best by joining through email.


If you made it to this point you will figure out how to tinker around with this app when you get there.
You got this far, you can take it from here!
Enjoy your meeting!
Blog Requests
If there is a topic that you would like to know more about, please leave a comment in my blog at the bottom and I will schedule a time to create something that makes whatever you are curious about easier to learn.
Following
So I have been at this for a little while now. If you are getting help from this blog, find it interesting, just plain stupid to mildly amusing it was suggested to me by a 13 year old that I am supposed to invite/encourage you to become a follower.
Hope you do thanks for watching, reading and...
See ya'!
Thursday, April 16, 2020
School From Home Session 16 Thursday April 16th Topic: Preparing for the world of online classes and April 20th
https://youtu.be/nJYmRbLBeWM
CLICK ME TO SEE THE BLOG OVERVIEW:
Hello everyone and welcome back to the Teach Simplified blog:
This posting is mostly for the benefit of my current students and their families but could offer ideas for the curious educators, administrators or just general learning nuts out there.
Here is a schedule for you to keep in mind and prepare for.
Thursday (today)
Today is the day for Chromebook pick up from the school for those that were able to sign up in time. The pick up time runs from 9am to 3pm.
If you were not able to get signed in please go to school website and sign up for one.
Students that have not signed in and set up their emails should do this today. After today I will simply refer you to previous blog posting to learn how to set it up. Please reach out to me via text if you need their password.
Friday April 17th (tomorrow)
1) Students have been invited to all of their classes. You will find an invitation to join the class in your school email. Be sure that you check in to EACH class. Checking and reading your email EVERYDAY will be big. I recommend you check before classes start or at the end of the day.
2) Three of you are ahead of the game and have already talked to me on Google Hangout. The rest of you need to check your invitation to join a class meeting. The invitation will be in your email.
Google Hangout Schedule for Friday April 17th:
1:00-1:30 open to parents for questions about the online learning coming up (must send your email address via text to get the invitation. Please sign up no later than noon on Friday.
1:30-2:00 Morning Math Class 3rd and 4th Grade Only
2:00-2:30 All 5th Grade Students
2:30-3:00 Afternoon Math Class 3rd and 4th Grade Only
3) Students and Families- be sure to check the blog, Dojo and/or the Google Classroom Homeroom for daily, news, updates and assignments.
Communication
I will continue to update the blog with daily news and things to be mindful of.
I will send out messages on Class Dojo.
I am looking to reduce group texts to reduce repeating messaging. Please check and see if you were recently invited to ClassDojo and sign up. It is the easiest way to stay in the loop.
You can also be invited to the Google Classroom Homeroom. I just need your email in order to do so if you would like to be involved that way.
In the Google Classroom Homeroom, I will also post updates for the next day.
Requests
If there is a topic that you would like to know more about, please leave a comment in my blog at the bottom and I will schedule a time to create something that makes whatever you are curious about easier to learn.
Monday April 20th (first day of 4th and last semester)
Monday through Thursday Schedule:
General Class Schedule: (tenative)
9:00-9:45am Morning Session with your assigned teacher (Reading or Math) Mon-Thursday
9:50-10:50 Morning independent practice, teachers have office hours for questions, small groups and prep
Lunch at 11:00
Gym at 11:40
11:45-12:25 pm Afternoon Session with assigned teacher (Reading of Math) Mon-Thursday
12:30-2:00 Afternoon independent practice, teachers have office hours for questions, small groups and prep
Friday Schedule:
Fridays you will have virtual field trips and questions session for Science and Social Studies
9am -10am
Any questions? You know where to fine me.
So.... See ya'!
Lew
Tuesday, April 14, 2020
School From Home Session 15 Tuesday April 14th Topic: How to create a YouTube Channel and Load Video Links to Google Classroom
Hello everyone and welcome back to the Teach Simplified Blog!
Today's post is mostly to support teachers or anyone interested in creating and sending a video link.
CLICK ON ME TO WATCH VIDEO FEED OF THE BLOG OVERVIEW
https://youtu.be/BnKpW6g0XP0
Lesson 1 Video Creation
Let's start with video creation. You can click on these pictures to enlarge them.

Step 1- Click your Windows button.
 Step 2- Click the Camera App you are about to embark on the magical world of video making!
 Step 3- You are ready to record. The green area is your video record start and stop. The small camera icon below that can be used for just taking a photo of your lovely mug. See greatness in the photo above!
Step 4- When you are done stop the recording from the button you pressed to start in the green circled area. Below that you should see a small picture in the bottom right corner. Click on it.
 Step 5- In the green semi-circle you will click on the 3 dots and Open Folder. Congratulations! You made a video and it is saved on your computer!
YOUR NEXT MOVE: www.youtube.com
You are about to enter the wild world of owning your own video channel in YouTube.
"Why?", you ask... When you load your video to YouTube, you will be able to create a link for your newly made video. You can then Copy and Paste the video link where you want it to go.
Lesson 2 Making a YouTube Channel and Uploading Your New Video
Step 1- Go to www.youtube.com by typing the website in your browser.
 Step 2- From here you will sign in. Our school emails don't allow access to it but you can sign in with a different email.
 Step 3- This will take you through the steps for creating your YouTube Channel.
 In the green circled space, I have created my YouTube Channel by following the steps. In the second step in blue, there is a little video camera icon with a plus symbol. Here is where you will upload your video from the computer file where you saved your video.
Step 4- Uploading your video to your YouTube Channel
 Click the blue button and your computer files will pop up. I saved my video in the camera roll. You may have put your video somewhere else but find it and double click it to upload.

I clicked on the Camera Roll Icon and picked my video to upload.

 The green arrow is showing you where the link is now for your new video. Be sure to copy it.

Step 6- Finishing touches. YouTube will want to know things like if it is made for kids. I always post viable content so I click yes to that. You will maybe want to add elements to your video, I haven't so far and then you will get to this screen. This is important because you should decide who you would want to see these videos in you Channel. You have all of the control so you decide. I post everything Public but if you just want it for the link so your students can see it then you can make a different choice. Click Save when you are done.
 Step 7- I don't use this window to send to other things. At this point your video is saved to your YouTube Channel and ready to use. I right click and click to copy the link. I am now ready to put that link where I want people to use it. I do this for my blog but for today I will show you how to put your link in Google Classroom.
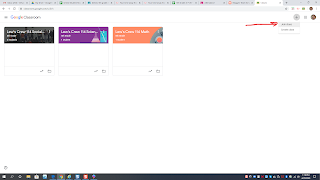
Step 8- Go to your Google Classroom
 After clicking on your Classroom you can put your link where you like. I just picked a class and put it in my announcements and gave them a chance to respond to how funny my hair looks in the video.
You just have to right click and paste the link there.
DONE!
https://youtu.be/xdiRYwbHYF8
Today's post is mostly to support teachers or anyone interested in creating and sending a video link.
CLICK ON ME TO WATCH VIDEO FEED OF THE BLOG OVERVIEW
https://youtu.be/BnKpW6g0XP0
Lesson 1 Video Creation
Let's start with video creation. You can click on these pictures to enlarge them.

Step 1- Click your Windows button.


Step 4- When you are done stop the recording from the button you pressed to start in the green circled area. Below that you should see a small picture in the bottom right corner. Click on it.

YOUR NEXT MOVE: www.youtube.com
You are about to enter the wild world of owning your own video channel in YouTube.
"Why?", you ask... When you load your video to YouTube, you will be able to create a link for your newly made video. You can then Copy and Paste the video link where you want it to go.
Lesson 2 Making a YouTube Channel and Uploading Your New Video
Step 1- Go to www.youtube.com by typing the website in your browser.


Step 4- Uploading your video to your YouTube Channel


I clicked on the Camera Roll Icon and picked my video to upload.

Step 5- Video is ready! Copy the link with a right click then hit Next.


Step 6- Finishing touches. YouTube will want to know things like if it is made for kids. I always post viable content so I click yes to that. You will maybe want to add elements to your video, I haven't so far and then you will get to this screen. This is important because you should decide who you would want to see these videos in you Channel. You have all of the control so you decide. I post everything Public but if you just want it for the link so your students can see it then you can make a different choice. Click Save when you are done.

Step 8- Go to your Google Classroom

You just have to right click and paste the link there.
DONE!
https://youtu.be/xdiRYwbHYF8
Subscribe to:
Posts (Atom)